Initial thoughts on Vulkan

Vulkan logo

I just finished watching the video of the Khronos GDC talk on Vulkan, and the corresponding slides, and I decided to share my initial thoughts on the new API, mostly in an attempt to consolidate them.

For those who missed the announcements of the last couple of days, Vulkan is supposed to be the successor to OpenGL, previously referred to as: glNext. The idea is to provide a low level API, basically a thin abstraction over the GPU hardware, along the lines of Apple Metal and AMD Mantle (as far as I’ve heard at least; I have no personal experience with either of the them).

I’ve been back and forth for a while, on whether I like or dislike this development. Until I realized that all my objections where centered around the idea that Vulkan is going to replace OpenGL. And by that, I mean that somehow everyone using OpenGL today, would switch over to Vulkan, something which is clearly not true. It is certainly talked about as a replacement for OpenGL, however in my opinion, it both is and isn’t. Let me explain…

OpenGL, from its inception, had a multiple personality disorder. This is clear just by reading the introductory chapter of the OpenGL specification document, which requires 4 consecutive sections, looking at OpenGL from different perspectives over the span of 3 pages, to attempt to define what OpenGL is:

  • 1.1 What is the OpenGL Graphics System?
  • 1.2 Programmer’s View of OpenGL
  • 1.3 Implementor’s View of OpenGL
  • 1.4 Our View

For me, and my daily hacking, OpenGL plays two distinct roles:

  • A way to access and utilize the GPU hardware, to take advantage of its capability to accelerate the various graphics algorithms required for real-time rendering.
  • A convenient 3D rendering library which is low level enough to not introduce obstacles in the form of cumbersome abstractions, while hacking graphics algorithms, yet high-level enough to make experimentation possible without necessarily having to write frameworks and abstractions for every task.

Based on that, it is now clear to me that Vulkan is indeed a very good replacement for the first use case, but completely unsuitable for the second. That’s why I think that Vulkan is not really a replacement of OpenGL. Vulkan and OpenGL can, and should coexist!

Vulkan looks like a perfect target for the reusable frameworks and engines. It provides some great opportunities for optimizations. I’m particularly excited about finally being able to multi-thread rendering code, without jumping through hoops (and performance bottlenecks) to serialize all API interactions through “the context thread”. I love the idea of having the API only deal with a concise intermediate representation of the shading language, which facilitates experimentation with new shading language frontends, off-line shader compilers, and avoids having to work around multiple vendors’ parser bugs and idiosyncrasies. I also like the idea of being able to manage the allocation and use of GPU resources, and the flow of data.

But, at the same time, I want the ease of use of OpenGL for my day to day hacks and experiments. I want immediate mode, matrix stacks, and the option of not having to care whether a texture or vertex buffer is currently backed by GPU memory or not.

I’ll go one step further, and this is really the gist of my thoughts on the matter: Not only should there be an OpenGL implementation over Vulkan, to use for experimental programs and one-off hacks, but ideally both should be seamlessly interoperable within the same program. Think of how powerful it would be to be able to start with an OpenGL prototype, and then go to the metal with Vulkan wherever you want to optimize! This way, to put it in 90s terms: Vulkan could be the assembly language of OpenGL.

Anyway, this pretty much sums up my initial thoughts on the Vulkan announcement. It’s still quite early and Vulkan itself is still in flux, so I guess we’ll have to wait and see how the whole thing turns out. But one thing is clear to me: Vulkan is very exciting, but OpenGL isn’t going to go away any time soon.

OculusVR SDK and simple oculus rift DK2 / OpenGL test program

Edit: I have since ported this test program to use LibOVR 0.4.4, and works fine on both GNU/Linux and Windows.

Edit2: Updated the code to work with LibOVR 0.5.0.1, but unfortunately they removed the handy function which I was using to disable the obnoxious “health and safety warning”. See the oculus developer guide on how to disable it system-wide instead.

I’ve been hacking with my new Oculus Rift DK2 on and off for the past couple of weeks now. I won’t go into how awesome it is, or how VR is going to change the world, and save the universe or whatever; everybody who cares, knows everything about it by now. I’ll just share my experiences so far in programming the damn thing, and post a very simple OpenGL test program I wrote last week to try it out, that might serve as a baseline.

OculusDK2 OpenGL test program

Read the rest of this entry »

Color space linearity and gamma correction

Ok so it’s a well known fact among graphics practitioners, that pretty much every game does rendering incorrectly. Since performance, and not correctness is always the prime consideration in game graphics, usually we tend to turn a blind eye towards such considerations. However with todays ultra-high performance programmable shading processors, and hardware LUT support for gamma correction, excuses for why we continue doing it the wrong way, become progressively more and more lame. :)

The gist of the problem with traditional real-time rendering, is that we’re trying to do linear operations, in non-linear color spaces.

Let’s take lighting calculations for example, when light hits a plane with 60 degrees incidence angle from the normal vector of the plane, Lambert’s cosine law states that the intensity of the diffusely reflected light off the plane (radiant exitance), is exactly half of the intensity of the incident light (irradiance) from that light source. However the monitor, responsible for taking all those pixel values and sending them rushing into our retinas, does not play along with our assumptions. That half intensity grey light we expect from that surface, becomes much darker due to the exponential response curve of the electron gun.

Simply put, when half the voltage of the full input range is applied to the electron gun, much less than half the possible electrons hit the phosphor in the glass, making it emmit lower than half-intensity light to the user. That’s not a defect of the CRT monitors; all kinds of monitors, tv screens, projectors, or other display devices work the same way.

So how do we correct that? We need to use the inverse of the monitor response curve, to correct our output colors, before they are fed to the monitor, so that we can be sure that our linear color space where we do our calculations, does not get bent out of shape before it reaches our eyes. Since the monitor response curve is approximately a function of the form: x^\gamma where \gamma = 2.2 usually, it mostly suffices to do the following calculation before we write the color value to the framebuffer: x^\frac{1}{\gamma}. Or in a pixel shader:

gl_FragColor.rgb = pow(color.rgb, vec3(1.0 / 2.2));

That’s not entirely correct, because if we are doing any blending, it happens after the pixel shader writes the color value, which means it would operate after this gamma correction, in a non-linear color space. It would be fine if this shader is a final post-processing shader which writes the whole framebuffer without any blending operations, but there is a better and more efficient way. If we just tell OpenGL that we want to output a gamma-corrected framebuffer, or more precisely a framebuffer in the sRGB color space, it can do this calculation using hardware lookup tables, after any blending takes place, which is efficient and correct. This fucntionality is exposed by the ARB_framebuffer_sRGB extension, and should be available on all modern graphics cards. To use it we need to request an sRGB-capable framebuffer during context creation (GLX_FRAMEBUFFER_SRGB_CAPABLE_ARB / WGL_FRAMEBUFFER_SRGB_CAPABLE_ARB), and enable it with glEnable(GL_FRAMEBUFFER_SRGB).

Now if we do just that, we’re probably going to see the following ghastly result:
bleach

The problem is that our textures are already gamma-corrected with a similar process, which makes them now completely washed out when we apply gamma correction in the end a second time. The solution is to make color values looked up from textures linear before using them, by raising them to the power of 2.2. This can either be done in the shader simply by: pow(texture2D(tex, tcoord).rgb, vec3(2.2)), or by using the GL_SRGB_EXT internal texture format instead of GL_RGB (EXT_texture_sRGB extension), to let OpenGL know that our textures aren’t linear and need conversion on lookups.

The result is correct rendering output, with all operations in a linear color space:
gamma-corrected rendering output

A final pitfall we may encounter is if we use intermediate render targets during rendering, with 8 bit per color channel resolution, we will observe noticable banding in the darker areas. That is because our 8bit/channel textures are now raised to a power and the result is again placed in an 8bit/channel render target, which obviously wastes color resolution and loses details, which cannot be replaced later on when we gamma correct the values again. Bottom-line is that we need higher precision intermedate render targets if we are going to work in a trully linear color space. The following screenshots show a dark area of the game when using a regular GL_RGBA intermediate render target (top), and when using a half-float GL_RGBA16F render target (bottom):

linear textures when using an 8bit/channel intermediate render target

linear textures when using an half-float intermediate render target

Color artifacts are clearly visible in the first image, around the dark unlit area.

Simple color-grading for games

Color grading is an easily overlooked, but extremely powerful way to add character to a game. Subtle color changes make day-night cycling much more atmospheric. Different areas can have their own signature “feel” based on how saturated the colors are. Dark games can shift the unlit areas of an environment to cool bluish tint that can remain visible but still feel like darkness. The possibilities are endless.

I haven’t given much thought to color grading before, until a friend (Samurai), told me of an extremely simple and powerful way to add color grading to a game. So simple in fact, that I had to try it as soon as possible!

The idea has two parts. First the obvious bit: Use a 3D texture as a look-up table, to map the RGB colors produced by the renderer to a different set of RGB colors which is the color-graded output. That translates to pretty much the following GLSL post-processing fragment shader:

uniform sampler2D framebuf;
uniform sampler3D gradelut;

void main()
{
    vec3 col = texture2D(framebuf, gl_TexCoord[0].st).xyz;
    gl_FragColor = vec4(texture3D(lut, col).xyz, 1.0);
}

And now the brilliant bit: write a bit of code to save a screenshot of the game with the “identity” 3D lookup-table serialized in the last few scanlines. Give that screenshot to an artist, and let him work his magic, color-grading it in photoshop or whatever… Did you get that? In the process of color-grading that screenshot, the artist automatically produces the look-up table which can be used to reproduce the same color-grading in-game, as part of the last few scanlines of the image! Feed that palette back into the game and it’s automatically color-graded!

So I used the dungeon crawler I’ve been writing recently to try out this algorithm. The output of my dungeon crawler as it stands, is not the best material to try color-grading on as it’s already very dark and highly tinted, leaving too little space for tweaking without banding everything to oblivion, but nevertheless I wrote the code, gave the screenshot to my friend Rawnoise to play with it in photoshop for a couple of minutes, fed it back into the game, and the result can be seen below.

Lower-left part of the screenshot produced by the game, with the identity palette attached:
grade-palette

Screenshot of the game before and after color grading:

Original dungeon crawler output Dungeon crawler output after color grading test

Of course you can always opt for a completely bizarre effect just as easily. This is the result of me moving color curves in gimp randomly, and then feeding the resulting palette into the game:
bizarr-o-dungeon

Obviously this algorithm opens up all sorts of interesting possibilities, such as having two palettes and interpolating between them during sunset, or when a player crosses the boundary between two areas, etc. Simple, yet effective.

Dungeon crawler game prototype

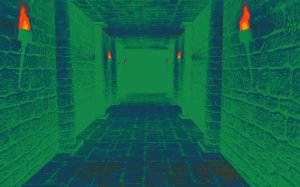
dungeon crawler prototype videoI started writting a first person dungeon crawler game recently. Nothing ground-breaking, but I intend to fill up the void of the simplistic gameplay with over the top eye-candy. My main inspiration comes from eye-of-the-beholder-esque dungeon crawlers with awesome graphics (for their respective times) such as stonekeep and the legend of grimrock, without necessarily intending to stay true to the retro 90 degree grid-based movement.

Before starting, I wanted to try out a couple of things to see how they feel in practice, so I decided to make a prototype. The main thing I wanted to try out was a suggestion of a friend of mine, for keeping the level creation as simple as possible, to use a regular grid tile-based system with a couple of enhancments. Namely:

  • Allowing multiple detail tiles on a single grid cell. Which makes it easy to lay down the whole level’s corridors and then add details such as torches on the walls, furnitures or whatever here and there.
  • Allowing arbitrary geometry for each tile, not necessarily contained in the volume of the grid cell it occupies. This would allow, for instance, elaborate prefab rooms to be attached at various places of the dungeon.

It turns out I don’t like the extended grid-based idea that much, and for the actual game I will revert to a more powerful level organization, I came up with some time ago. More on that when I actually implement it.

The rendering is done with “deferred shading“, a neat technique I implemented once before in the Theseis engine, which makes it possible to have hundreds of actual dynamic light sources active at the same time. This is the cornerstone of my “lots of eye-candy” idea, because it enables each and every torch, spell effect, flame, or magical glow to illuminate the dungeons and its denizens dynamically.

Finally I implemented a nice positional audio and music playback system, on top of OpenAL. It keeps static audio sources in a kd-tree for efficient selection of the nearest ones within a certain radius around the player and enables/disables the appropriate ones automatically.

In case you are curious to see it, I just uploaded a video on youtube. The actual tileset is obviously placeholder, since I made it myself in blender, to be replaced by proper artwork later on. The music and sound effects are made by George Savinidis, who will be in change of all the audio production for this game.

OpenGL video editing hack

video post result shot
Hello, just a quick hack report cause I really liked how useful it turned out to be.

It all started when I located a small program I wrote, for an interesting coursework assignment, back when I did my graphics MSc at the University of Hull. I wanted to upload a video capture to youtube to show 4rknova who’s going through the same MSc course right now.

So I did capture the video, and saved it as an image sequence for further editing, because I wanted to add titles at the bottom describing what was demonstrated at each part of the video (the program was basically a sequence of arbitrary shader effects).

But how was I supposed to add the captions? The thought of wrestling with one of those fucking GUI video editing programs made me cringe. They are all slughish, heavy and unweildy, and I always have to fight for a few hours to do even simple things. I was more inclined to use ffmpeg from the command line, but then adding transitions to the captions, like having them fade and slide in from below would be a complete pain in the ass. Btw take a look at the final video to understand what I was trying to achieve with the caption transitions. Should be really simple right?

But then it dawned … hey, I could easily write that transition in a couple lines of C/OpenGL code instead of fighting with all those video editing programs! I started by writing a simple program that iterates over an input image sequence, opening each one in turn and then feeding them one by one to a dlopened plugin which could do whatever it likes with the frame. When that plugin processing function returns, I just dump the image back to the disk. It’s that simple!

Then the plugin was almost trivial as well. I just drop the frame into the OpenGL framebuffer and use my new text rendering library to draw the captions at the appropriate times with the appropriate alpha and position. The timing was derived by a simple event script file containing the frame numbers where each part starts and ends. I fed the script into my new event sequencing (demosystem) library which gives me back a nice linearly increasing [0, 1] value for each event (part) during the time when it is active according to the script. That makes it a piece of cake to fiddle with trig and some factors here and there to transition my captions just the way I wanted.

Here’s the code in case you want to play around with it:

I’m impressed, it’s fucking awesome and powerful to edit videos like that, and I’m definitely going to use it again.

Stereoscopic fun on iOS

[Edit: this app is now available on the appstore, and has a dedicated web page]

The fun never stops with stereoscopic rendering. I posted previously about my earlier attempts with anaglyphs and shutter glasses, and all that was really fun, but not without drawbacks. Shutter glasses are awesome, but the only computer I have with a stereo output is an old SGI workstation, which isn’t up to the task to render modern 3D graphics, and doesn’t event give me stereo OpenGL visuals and a depth buffer at the same time. Anaglyph glasses are cheap and work everywhere, but they mess up the colors and they have a serious problem with ghosting, ruining the stereoscopic effect.

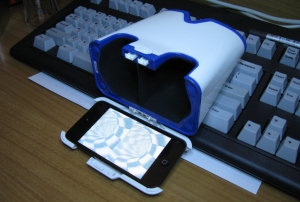
My3D ipod stereo tunnel
So, it was with great enthousiasm that I learned there’s a cheap and simple stereoscopic viewing contraption for the iphone produced by hasbro. It’s sortof like a viewmaster, only instead of cardboard reel with stereoscopic pictures, it has a place to attach an iphone or ipod touch on the back of it, using it as the source of the stereoscopic image presented to the user. What needs to be done iphone-side is simple enough. Just make it display a stereo pair side by side in a split-screen. The only drawback of this approach, is that since the iphone display is split in half, the achievable aspect ratio is slightly less than 1 which has an impact on immersion, making the perception more like looking through a squarish window into the 3D world rather than being surrounded by it. Still very impressive for a 28 dollar plastic widget.

Buying this apparatus gave me the final push I needed to get onto iOS programming. I find Objective-C unspeakably ugly and the Apple APIs needlessly convoluted, which was why I kept pushing this back, but I really wanted to see my code in glorious stereoscopic … glory, so I bit the bullet and ported over the stereoscopic tunnel program I’ve written originally for the SGI when I bought the shutter glasses.

The result is awesome; full stereo 3d without color degradation on modern programmable graphics hardware. Unfortunately one has to use the crippled version of OpenGL that’s become so popular on mobile devices lately: OpenGL ES 2.0 (see webgl post for my rant on that issue), but it was easy enough to make a wrapper that brings back immediate mode and the matrix stack.

In case you’d like to play around with the code, here’s a tarball. Feel free to use it under the terms of the GPLv3. It includes an Xcode project that compiles it for the iphone and a makefile for normal systems. If you run the program on your iphone tap anywhere on the screen to go to the options GUI to enable stereo rendering or change between the simple and the normal-mapped tunnel (keys s and b on the PC version).

WebGL hacks

webgl julia quaternion raytracerThat’s it, I finally found something fun in web development! I never thought I’d live to see the day when I would feel the motivation to learn javascript, but here we are. WebGL is fun, because you can do all the things you could with regular OpenGL, but now you can send URLs to all your friends to show off. I can’t say I liked javascript really, but I guess it’s passable as long as you can avoid the horrible conventions people have established for pretending to write object-oriented code with it.

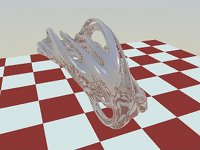
So what I did, after experimenting to see how WebGL and javascript programming works, is a port of a GPU-raytracer for 4D quaternion Julia fractals, and a simple 360-panorama viewer. You can find those on my webgl hacks page I put up yesterday.

About WebGL itself now, I’m really disappointed they chose to base it on OpenGL ES 2.0, which is the bastard child of a slashed down OpenGL subset initially spec’ed for fixed point embedded devices, and Khronos’ OpenGL >= 3 d3d10-buttlicking madness. I understand why they chose that, because they intend to have WebGL easily implementable on mobile phones and tablets, but I’m still disappointed.

For those of you not well versed in the differences between the various OpenGL versions that suddenly crept up when Khronos group took control of OpenGL and apparently surrendered it over to inmates of the nearest insane asylum, I’ll give you a short overview of what sucks in OpenGL >= 3.x, OpenGL ES 2.0, and WebGL:

  • No fixed function pipeline. Yeah I know shaders are awesome, I love them too. But it’s convenient to be able to put a goddamn texture on a quad without having to write a bloody shader for it. OpenGL is not just used for video games you know.
  • No immediate mode (glBegin). Again, yes immediate mode is slow if you use it to draw multimillion vertex meshes, but having to make a vertex buffer for a quad representing a button in a GUI or a simple overlay, is insanity.
  • No matrix stack. Obviously when I’m writing a full 3D engine, with hierarchical keyframe animation, I have to ignore the matrix stack and write my own quaternion/matrix code. But for everything else, the OpenGL matrix functions are unbelievably useful.
  • No GL_QUADS.

So anyway, while I was playing around with it these past few days, I had to bring back a little bit of sanity to WebGL. For that reason I wrote SaneGL, a small piece of code that implements immediate mode drawing, and the OpenGL matrix stack on top of WebGL. I bundled that along with a small matrix math library and some helper functions for WebGL programs in a project called webgl-tools, which you can find in my mercurial repository: http://nuclear.mutantstargoat.com/hg/webgl-tools.

Oh by the way, if you’re one of those misguided sods that keep using windows, and you try to run any webgl apps right now you will probably be disappointed. In an unprecedented inspiration of pure stupidity, both firefox4 and chrome chose to implement WebGL over Direct3D by default on windows, using a project called ANGLE. The reason for that, they say, is that most graphics card vendors provide buggy OpenGL implementations on windows, so apparently it makes sense to write an even more buggy OpenGL->D3D translator and use that.

Initially I thought that ANGLE fails to translate huge shaders such as the one on my fractal raytracer, but in fact it seems to fail on pretty much everything, complex or trivial. The only way for windows users to use WebGL at the moment until mozilla and google comes to their senses and make ANGLE a fallback for known buggy OpenGL implementations instead of the default choice, is to go and force the browsers to use OpenGL instead. On firefox you can do that by setting the about:config variable “webgl.prefer-native-gl” to true, while chrome requires the command-line argument: –use-gl=desktop.

On GNU/Linux, as long as you have an nvidia card everything should be peachy from the get-go. Other cards are apparently blacklisted by firefox, so you’ll have to set webgl.force-enable to true, and pray to Odin.

Escaping glutMainLoop

Let’s say you’re writing a distinctly glut-like window-system abstraction library for OpenGL context creation, event handling, etc. For those not familliar with the way one uses OpenGL to draw graphics, what happens is you talk to the native window system (X11, Win32 API, etc) to create a window and process events, then you create an OpenGL context and you bind it to that window using again platform-specific calls (GLX, WGL, etc).

So let’s say you’re writing that code, but you decided your library will allow the user to keep control of the main loop, so you provide a funcion called something like process_events to run a single iteration of your event processing, so that the user may call it in a loop. How do you implement that on top of glut, which has a single glutMainLoop function that doesn’t ever return?

By the way, for those curious on why would you do that in the first place, the reason to write a glut backend for this library, would be as a catch-all fallback to be able to run on platforms for which no native backend is yet written.

On GNU/Linux systems generally we don’t have the original GLUT, but rather FreeGLUT, which is nice enough to provide a glutMainLoopEvent function which runs a single iteration of the event loop, so we just call that from process_events and we’re done. But I have actually written an X11/GLX backend for my library, so I don’t need GLUT there, I need it on other systems. So how to break the chains of glutMainLoop and return after each iteration of the event handling loop?

The solution is obvious, use setjmp/longjmp. In process_events we call setjmp which obviously returns 0 the first time around, in which case glutMainLoop is called. Now glut enters its infinite loop and waits for events from the window system. As soon as all pending events are processed, or if there are no events to be processed, it calls our idle callback, then when that returns it loops back to the top again, and again, and again.

Of course we set up an idle callback that doesn’t actually return. It calls the user’s idle callback if there’s one registered, and then calls longjmp which unwinds the stack until we end up back into process_events at which point setjmp returns non-zero and we return execution to the user.

One minor issue that needs to be addressed is that since we set an idle function, if the user didn’t set one with our library, we’re wasting cpu cycles busy-looping because GLUT will never block waiting for events when there’s an idle callback. This again is easily remedied. If the user didn’t register an idle function with us, we don’t actually set our idle function to GLUT a-priori, instead we wait for one of the other event callbacks to trigger, and at the end of those callbacks we set the idle callback, and remove it again when it gets called, before longjmping back to the user.

Here are a few snippets of the actual code demonstrating the above:
Read the rest of this entry »

Stereoscopic OpenGL part2

Me with my shutter glassesMy obsession with stereoscopic rendering continues unabated. It’s just so fucking cool to write a bit of code and have 3D objects pop outside of your monitor and float above your keyboard.

Fact is, I couldn’t settle with my crummy anaglyph glasses see previous post. I had to try out proper shutter glasses and quad-buffer OpenGL visuals.

Thanks to nvidia’s policy of supporting quad-buffer visuals and stereo ports only on expensive Quadro graphics boards, and the proliferation of flat panels which are entirely unsuitable for use with shutter glasses due to ridiculously low refresh rates, I couldn’t do that with my PC. On the other hand, my trusty Silicon Graphics Octane2 workstation was more than up to the task as it comes with a stereo synchronization port and quad-buffered OpenGL support out of the box.

So off I go to ebay, where I bought the cheapest lcd shutter glasses I could find, the ASUS VR100 glasses which came once upon a time bundled with some expensive ASUS TNT2 graphics cards as a high-end gimmick.

SGI to ASUS VR100 adaptor circuitConnecting these glasses to SGI workstations has been done before and it was a piece of cake to follow that guy’s schematic and construct the necessary circuit to translate the signals from the SGI stereo port to those required by the shutter glasses.

The only problem I’ve had, is that my Octane2 has the low-end V6 graphics option, which apparently doesn’t provide a z-buffer when using stereo visuals.

3D tunnelNow I didn’t feel like z-sorting all polygons like the good old days when z-buffering was too expensive to use on underpowered PCs while doing software polygon rendering, so I tried to figure out a couple of graphics hacks that I could do which wouldn’t require a z-buffer to look right. So I came up with this swirling tunnel, and a simple wireframe teapot.