Catching up: homebrew retro computer projects (Z80 and 68010)

Another catchup post, about my homebrew retro-computer projects. This started in 2016 when I made an extremely rudimentary, completely lacking in I/O capability, but extremely educational Z80 computer. I uploaded a video about it on youtube, while it was still on the breadboard stage, which demonstrated very clearly how the Z80 computer fetches and executes instructions by single-stepping the clock and inspecting the state of the data and address busses, as well as some important processor control signals at each step. Later I uploaded a short followup video to let it execute the program with a free-running clock. I also did a talk with the same demonstration at fosscomm 2016 with the final PCB version of this computer, but unfortunately there is no video of the event.

rudimentary Z80 8-bit computer

The next step was to make an improved homebrew computer, with proper I/O capabilities, which would be actually usable as a computer instead of just an educational demonstration. Initially I started designing an improved 8-bit computer based again on the Z80 processor, but soon I scrapped those plans and designed a 16-bit computer based on the Motorola 68000 processor instead.

The first video I uploaded about the 68k computer project was actually an attempt to familiarize myself with the processor by performing a similar single-stepping experiment again. This time I thought it would be fun to use a switches and LEDs panel similar to the old PDP or Altair interfaces to feed the processor with opcodes during the bus cycles. The video is somewhat long-winded, but I think if you skip the boring introduction, it’s also very educational, showing how to assemble a test program by hand, and how to coerce the 68k to single-step bus cycles while still keeping a continuously running clock, which is required for this processor to maintain its internal state.

I also uploaded a short followup progress report video shortly thereafter, with the computer constructed on a proper PCB, which shows the serial I/O interface and a bug in my initial design.

The computer works in this simple state, and I’m able to upload cross-compiled C programs through the serial port, and run them. It was a lot of fun reaching this stage, but then I got too lazy and didn’t even upload a proper demonstration video for that, or continue improving it for some time now.

homebrew 16bit motorola 68010 computer.

To make it more interesting, I made a test program for my 68k computer which calculates a koch snowflake fractal, and sends graphics commands to the serial terminal to draw it. Here’s a screenshot of xterm, which supports the vt330/vt340 ReGIS graphics commands.

My 68010 computer drew its first fractal

Edit: video of the computer running two test programs.

OculusVR SDK and simple oculus rift DK2 / OpenGL test program

Edit: I have since ported this test program to use LibOVR 0.4.4, and works fine on both GNU/Linux and Windows.

Edit2: Updated the code to work with LibOVR 0.5.0.1, but unfortunately they removed the handy function which I was using to disable the obnoxious “health and safety warning”. See the oculus developer guide on how to disable it system-wide instead.

I’ve been hacking with my new Oculus Rift DK2 on and off for the past couple of weeks now. I won’t go into how awesome it is, or how VR is going to change the world, and save the universe or whatever; everybody who cares, knows everything about it by now. I’ll just share my experiences so far in programming the damn thing, and post a very simple OpenGL test program I wrote last week to try it out, that might serve as a baseline.

OculusDK2 OpenGL test program

Read the rest of this entry »

Plugin reloading for 3dsmax exporters

I revisited recently a dormant project of mine, for which I unfortunately need to write a 3dsmax exporter plugin.

Now, I’m always pissed off from the start when I have to write code on windows and visual studio, but having to deal with 3dsmax on top of that, really just adds insult to injury. It’s not just that maxsdk is a convoluted mess. Or that it needs a very specific version of visual studio to write plugins for it (which is really Microsoft’s fault, to be fair). No, my biggest issue so far is that 3dsmax takes about 3 years to start up, and there is no way to unload, or reload a plugin without restarting it.

Whenever I fix a tiny thing in the exporter plugin I’m writting, and I want to try it out and see if it does the buissiness, I have to shut down 3dsmax, start it up again (which takes forever), load my test scene, then try to export again and see what happens. This is obviously unacceptable, so I really had to do something about it.

Read the rest of this entry »

Dungeon crawler game prototype

dungeon crawler prototype videoI started writting a first person dungeon crawler game recently. Nothing ground-breaking, but I intend to fill up the void of the simplistic gameplay with over the top eye-candy. My main inspiration comes from eye-of-the-beholder-esque dungeon crawlers with awesome graphics (for their respective times) such as stonekeep and the legend of grimrock, without necessarily intending to stay true to the retro 90 degree grid-based movement.

Before starting, I wanted to try out a couple of things to see how they feel in practice, so I decided to make a prototype. The main thing I wanted to try out was a suggestion of a friend of mine, for keeping the level creation as simple as possible, to use a regular grid tile-based system with a couple of enhancments. Namely:

  • Allowing multiple detail tiles on a single grid cell. Which makes it easy to lay down the whole level’s corridors and then add details such as torches on the walls, furnitures or whatever here and there.
  • Allowing arbitrary geometry for each tile, not necessarily contained in the volume of the grid cell it occupies. This would allow, for instance, elaborate prefab rooms to be attached at various places of the dungeon.

It turns out I don’t like the extended grid-based idea that much, and for the actual game I will revert to a more powerful level organization, I came up with some time ago. More on that when I actually implement it.

The rendering is done with “deferred shading“, a neat technique I implemented once before in the Theseis engine, which makes it possible to have hundreds of actual dynamic light sources active at the same time. This is the cornerstone of my “lots of eye-candy” idea, because it enables each and every torch, spell effect, flame, or magical glow to illuminate the dungeons and its denizens dynamically.

Finally I implemented a nice positional audio and music playback system, on top of OpenAL. It keeps static audio sources in a kd-tree for efficient selection of the nearest ones within a certain radius around the player and enables/disables the appropriate ones automatically.

In case you are curious to see it, I just uploaded a video on youtube. The actual tileset is obviously placeholder, since I made it myself in blender, to be replaced by proper artwork later on. The music and sound effects are made by George Savinidis, who will be in change of all the audio production for this game.

WebGL hacks

webgl julia quaternion raytracerThat’s it, I finally found something fun in web development! I never thought I’d live to see the day when I would feel the motivation to learn javascript, but here we are. WebGL is fun, because you can do all the things you could with regular OpenGL, but now you can send URLs to all your friends to show off. I can’t say I liked javascript really, but I guess it’s passable as long as you can avoid the horrible conventions people have established for pretending to write object-oriented code with it.

So what I did, after experimenting to see how WebGL and javascript programming works, is a port of a GPU-raytracer for 4D quaternion Julia fractals, and a simple 360-panorama viewer. You can find those on my webgl hacks page I put up yesterday.

About WebGL itself now, I’m really disappointed they chose to base it on OpenGL ES 2.0, which is the bastard child of a slashed down OpenGL subset initially spec’ed for fixed point embedded devices, and Khronos’ OpenGL >= 3 d3d10-buttlicking madness. I understand why they chose that, because they intend to have WebGL easily implementable on mobile phones and tablets, but I’m still disappointed.

For those of you not well versed in the differences between the various OpenGL versions that suddenly crept up when Khronos group took control of OpenGL and apparently surrendered it over to inmates of the nearest insane asylum, I’ll give you a short overview of what sucks in OpenGL >= 3.x, OpenGL ES 2.0, and WebGL:

  • No fixed function pipeline. Yeah I know shaders are awesome, I love them too. But it’s convenient to be able to put a goddamn texture on a quad without having to write a bloody shader for it. OpenGL is not just used for video games you know.
  • No immediate mode (glBegin). Again, yes immediate mode is slow if you use it to draw multimillion vertex meshes, but having to make a vertex buffer for a quad representing a button in a GUI or a simple overlay, is insanity.
  • No matrix stack. Obviously when I’m writing a full 3D engine, with hierarchical keyframe animation, I have to ignore the matrix stack and write my own quaternion/matrix code. But for everything else, the OpenGL matrix functions are unbelievably useful.
  • No GL_QUADS.

So anyway, while I was playing around with it these past few days, I had to bring back a little bit of sanity to WebGL. For that reason I wrote SaneGL, a small piece of code that implements immediate mode drawing, and the OpenGL matrix stack on top of WebGL. I bundled that along with a small matrix math library and some helper functions for WebGL programs in a project called webgl-tools, which you can find in my mercurial repository: http://nuclear.mutantstargoat.com/hg/webgl-tools.

Oh by the way, if you’re one of those misguided sods that keep using windows, and you try to run any webgl apps right now you will probably be disappointed. In an unprecedented inspiration of pure stupidity, both firefox4 and chrome chose to implement WebGL over Direct3D by default on windows, using a project called ANGLE. The reason for that, they say, is that most graphics card vendors provide buggy OpenGL implementations on windows, so apparently it makes sense to write an even more buggy OpenGL->D3D translator and use that.

Initially I thought that ANGLE fails to translate huge shaders such as the one on my fractal raytracer, but in fact it seems to fail on pretty much everything, complex or trivial. The only way for windows users to use WebGL at the moment until mozilla and google comes to their senses and make ANGLE a fallback for known buggy OpenGL implementations instead of the default choice, is to go and force the browsers to use OpenGL instead. On firefox you can do that by setting the about:config variable “webgl.prefer-native-gl” to true, while chrome requires the command-line argument: –use-gl=desktop.

On GNU/Linux, as long as you have an nvidia card everything should be peachy from the get-go. Other cards are apparently blacklisted by firefox, so you’ll have to set webgl.force-enable to true, and pray to Odin.

Escaping glutMainLoop

Let’s say you’re writing a distinctly glut-like window-system abstraction library for OpenGL context creation, event handling, etc. For those not familliar with the way one uses OpenGL to draw graphics, what happens is you talk to the native window system (X11, Win32 API, etc) to create a window and process events, then you create an OpenGL context and you bind it to that window using again platform-specific calls (GLX, WGL, etc).

So let’s say you’re writing that code, but you decided your library will allow the user to keep control of the main loop, so you provide a funcion called something like process_events to run a single iteration of your event processing, so that the user may call it in a loop. How do you implement that on top of glut, which has a single glutMainLoop function that doesn’t ever return?

By the way, for those curious on why would you do that in the first place, the reason to write a glut backend for this library, would be as a catch-all fallback to be able to run on platforms for which no native backend is yet written.

On GNU/Linux systems generally we don’t have the original GLUT, but rather FreeGLUT, which is nice enough to provide a glutMainLoopEvent function which runs a single iteration of the event loop, so we just call that from process_events and we’re done. But I have actually written an X11/GLX backend for my library, so I don’t need GLUT there, I need it on other systems. So how to break the chains of glutMainLoop and return after each iteration of the event handling loop?

The solution is obvious, use setjmp/longjmp. In process_events we call setjmp which obviously returns 0 the first time around, in which case glutMainLoop is called. Now glut enters its infinite loop and waits for events from the window system. As soon as all pending events are processed, or if there are no events to be processed, it calls our idle callback, then when that returns it loops back to the top again, and again, and again.

Of course we set up an idle callback that doesn’t actually return. It calls the user’s idle callback if there’s one registered, and then calls longjmp which unwinds the stack until we end up back into process_events at which point setjmp returns non-zero and we return execution to the user.

One minor issue that needs to be addressed is that since we set an idle function, if the user didn’t set one with our library, we’re wasting cpu cycles busy-looping because GLUT will never block waiting for events when there’s an idle callback. This again is easily remedied. If the user didn’t register an idle function with us, we don’t actually set our idle function to GLUT a-priori, instead we wait for one of the other event callbacks to trigger, and at the end of those callbacks we set the idle callback, and remove it again when it gets called, before longjmping back to the user.

Here are a few snippets of the actual code demonstrating the above:
Read the rest of this entry »

Linuxtrack 6dof headtracking for wine games

linuxtrack-wine logoSince I was a little kid, I always loved airplanes. When I became a little older, mainly during the 90s I used to play a lot of flight simulators on my computer, I even had a set of decent flight controls (stick/throttle), but for some reason I dropped that hobby for many years. Until I very recently picked it up again.

One really important thing that changed during my abstinence from flight simulators, a huge change that transformed the whole experience, was the almost universal adoption of 6dof headtracking for looking around as you fly!

Now people are able, with simple intuitive movements of their head to be able to look outside as they fly above that beautiful lake, “check six” to effectively maneuver to avoid an enemy plane in a dogfight, or follow the runway with their own eyes as the airplane turns slowly into final approach to line up perfectly for landing! Even better, since 6dof headtracking includes translation as well as rotation, the user can look around an obstacle blocking the view, to see for instance a pesky instrumment in the panel that’s partly hidden behind the stick, or a plane in formation which happens to fly just where the canopy frame happens to have a metal support bar. Just moving the head a bit to the left or the right does the trick… Unbelivable!

Instrumental for the universal adoption of 6dof headtracking among flight simulator users and developers, is a company called NaturalPoint who sells a complete head-tracking system called TrackIR, that includes an infrared high framerate camera, markers that the user attaches to their heads, and supplies an API to game developers to access their headtracking data easily. Now that set doesn’t come cheap, so there’s the necessary free alternative out there, that works with a simple (or even better modified) webcam, called freetrack. The main problem with both of those as you might have guessed, is that they only work on windows.

After the first dissapointment, I obviously had to have that functionality, so I decided to start hacking my old 3dof headtracking experiment to make it 6dof and connect it somehow with games running through wine. However, while I was researching how to do that, I stumbled upon the linux-track project, which does exactly what I needed, but it only worked with a native GNU/Linux flight simulator called x-plane.

So, with only a small piece of the puzzle missing, I went on and wrote a program that emulates the TrackIR API which is supported by many windows games, but feeds them data from linuxtrack instead. Currently I’m happily playing IL-2 Sturmovik and Falcon4 AF through wine, with full head-tracking support, enjoying the virtual view from my cockpit.

This new project of mine is called linuxtrack-wine and is available under GNU GPLv3.

I also had to do a hardware hack, to convert my old flight controllers from gameport to USB, but that’s much less interesting, and I’m too lazy to write about it right now :)

Serial Spaceball and Spacenavd

I finally got my hands on a serial spaceball device. Apparently non-USB devices are literally given away on ebay for ridiculously small amounts of money, so I managed to get this wonderful Spaceball 4000 FLX for 12 pounds a couple of days ago!

spaceballs

I wanted a serial spaceball for two reasons: first of all I meant to add support for serial devices to spacenavd for a long time now. In fact John Stone was kind enough to send me his code to interface with serial spaceballs a long time ago, but not having such a device myself, for testing, I wasn’t very keen to hack at it blindly. Also, I wanted to be able to use a 6dof input device with my SGI Octane2, which doesn’t have any USB ports.

So finally, as soon as I got my hands on the serial spaceball, I went on and added serial support to spacenavd. I haven’t released a new version of spacenavd yet, because I want to iron out some details first, but you can always get the new serial-capable spacenavd through subversion if you need it.

FreeGLUT spaceball patch

The original GLUT library used to support some less well-known input devices under IRIX, such as the Spaceball, a true 3D input device which can be used to control all 6 degrees of freedom (3 axis of rotation and 3 axis of translation) simultaneously. Unfortunately, nowadays, the more “exotic” input callbacks of GLUT such as the spaceball are left unimplemented.

So, yesterday I sat down and implemented the missing spaceball bits of FreeGLUT, which is the most widely used free GLUT implementation.

To avoid adding any extra dependencies to freeglut, I just ripped the relevant code from libspnav, which is part of my free spacenav driver project, and added it directly into freeglut.

Here’s the patch against the current freeglut svn head, as well as instructions on how to check out freeglut and apply it.

I’ve also submitted it to the freeglut-devel mailing list, so hopefully they’ll merge it and we’ll have spaceball input callbacks available with the prepackaged glut that comes with any GNU/Linux distribution in the future.

S-ray goes public

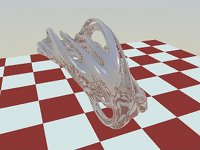
S-ray is a photorealistic off-line renderer I’ve been writting on and off for the past few months. It’s basically a monte carlo ray tracer using the photon mapping algorithm to simulate global illumination effects, such as indirect diffuse lighting and caustics.

So, it’s time to open up the code and continue development in the open. The code is available only through subversion at the moment, no official “0.1” release shall be made until at least the most important outstanding bugs are fixed. However, feel free to checkout the code and play around all you want.

The project is hosted at googlecode, and you can find it at: http://code.google.com/p/sray
As always, ideas, comments, or bug fixes are more than welcome.