Proper Oculus Rift DK2 setup on GNU/Linux

This is a quick post about the proper way to set up the Oculus Rift DK2 on GNU/Linux, which might not be obvious for users not deeply familiar with the X window system.

Introduction

(feel free to skip)

I remember discussing this a long time ago in the oculus forums, back when the linux version of the oculus SDK was doing absurdities such as relying on Xinerama to detect and use the oculus display. Setting up the rift display as an extension of the desktop, is wrought with peril and woe. Thankfully, the X window system is awesome, and used to deal with such diverse multi-display contraptions, back when burly men programmed computers made of pumps, grease, and steel… true story.

Read the rest of this entry »

Initial thoughts on Vulkan

Vulkan logo

I just finished watching the video of the Khronos GDC talk on Vulkan, and the corresponding slides, and I decided to share my initial thoughts on the new API, mostly in an attempt to consolidate them.

For those who missed the announcements of the last couple of days, Vulkan is supposed to be the successor to OpenGL, previously referred to as: glNext. The idea is to provide a low level API, basically a thin abstraction over the GPU hardware, along the lines of Apple Metal and AMD Mantle (as far as I’ve heard at least; I have no personal experience with either of the them).

I’ve been back and forth for a while, on whether I like or dislike this development. Until I realized that all my objections where centered around the idea that Vulkan is going to replace OpenGL. And by that, I mean that somehow everyone using OpenGL today, would switch over to Vulkan, something which is clearly not true. It is certainly talked about as a replacement for OpenGL, however in my opinion, it both is and isn’t. Let me explain…

OpenGL, from its inception, had a multiple personality disorder. This is clear just by reading the introductory chapter of the OpenGL specification document, which requires 4 consecutive sections, looking at OpenGL from different perspectives over the span of 3 pages, to attempt to define what OpenGL is:

  • 1.1 What is the OpenGL Graphics System?
  • 1.2 Programmer’s View of OpenGL
  • 1.3 Implementor’s View of OpenGL
  • 1.4 Our View

For me, and my daily hacking, OpenGL plays two distinct roles:

  • A way to access and utilize the GPU hardware, to take advantage of its capability to accelerate the various graphics algorithms required for real-time rendering.
  • A convenient 3D rendering library which is low level enough to not introduce obstacles in the form of cumbersome abstractions, while hacking graphics algorithms, yet high-level enough to make experimentation possible without necessarily having to write frameworks and abstractions for every task.

Based on that, it is now clear to me that Vulkan is indeed a very good replacement for the first use case, but completely unsuitable for the second. That’s why I think that Vulkan is not really a replacement of OpenGL. Vulkan and OpenGL can, and should coexist!

Vulkan looks like a perfect target for the reusable frameworks and engines. It provides some great opportunities for optimizations. I’m particularly excited about finally being able to multi-thread rendering code, without jumping through hoops (and performance bottlenecks) to serialize all API interactions through “the context thread”. I love the idea of having the API only deal with a concise intermediate representation of the shading language, which facilitates experimentation with new shading language frontends, off-line shader compilers, and avoids having to work around multiple vendors’ parser bugs and idiosyncrasies. I also like the idea of being able to manage the allocation and use of GPU resources, and the flow of data.

But, at the same time, I want the ease of use of OpenGL for my day to day hacks and experiments. I want immediate mode, matrix stacks, and the option of not having to care whether a texture or vertex buffer is currently backed by GPU memory or not.

I’ll go one step further, and this is really the gist of my thoughts on the matter: Not only should there be an OpenGL implementation over Vulkan, to use for experimental programs and one-off hacks, but ideally both should be seamlessly interoperable within the same program. Think of how powerful it would be to be able to start with an OpenGL prototype, and then go to the metal with Vulkan wherever you want to optimize! This way, to put it in 90s terms: Vulkan could be the assembly language of OpenGL.

Anyway, this pretty much sums up my initial thoughts on the Vulkan announcement. It’s still quite early and Vulkan itself is still in flux, so I guess we’ll have to wait and see how the whole thing turns out. But one thing is clear to me: Vulkan is very exciting, but OpenGL isn’t going to go away any time soon.

Tutorial: Practical makefiles, by example

I know a lot of programmers, who are afraid of makefiles. Most of them come from a windows background, and when they migrate to GNU/Linux or MacOS X they naturally gravitate towards clunky IDEs to manage their build process. Others, fearing that makefiles are going to be too complex to manage manually, try to use even clunkier makefile (or project file) generators like cmake.

While none of the above solutions is without some merit in particular cases, I strongly believe that there’s no faster and simpler way to build your project, than writing a small makefile. And in order to dispel the fear, I decided to write a tutorial about how to write simple, practical makefiles, for your programs.

The article is too big and too … structured, for my idea of what a blog post should be, so I’m hosting it on my web site along with some of my previous articles instead.

So anyway here it is, let me know if you find it useful: Practical makefiles, by example.
Feel free to use the comments section in this post for any feedback, or send me an email if you prefer.

Btw, I used reStructuredText, and the docutils translators for this. So there’s also a PDF version, produced through the rst2latex translator. It’s not as good as it could have been if I wrote it directly in LaTeX, but I suppose it’s serviceable if you prefer a printable off-line version.

How to use standard output streams for logging in android apps

android_dev

Android applications are strange beasts. Even though under the hood it’s basically a UNIX system using Linux as its kernel, there are other layers between (native) android apps and the bare system, that some things are bound to fall through the cracks.

When developing android apps, one generally doesn’t login to the actual device to compile and execute the program; instead a cross-compiler is provided by google, along with a series of tools to package, install, and execute the app. The degrees of separation from the actual controlling terminal of the application, make it harder to just print debugging messages to the stdout and stderr streams and watch the output like one could do while hacking a regular program. For this reason, the android NDK provides a set of logging functions, which append the messages to a global log buffer. The log buffer can be viewed and followed remotely, from the development machine, over USB, by using the “adb logcat” tool.

This is all well and good, but if you’re porting a program which prints a lot of messages to stdout/stderr, or if you just like the convenience of using the standard printf/cout/etc functions, instead of funny looking stuff like __android_log_print(), you might wonder if there is a way to just use the standard I/O streams instead, right? Well so did I, and guess what… this is still UNIX so the answer is of course you can!

Read the rest of this entry »

Fixing old bugs, without the source

Once upon a time, I made a special kind of demoscene production: a wedtro. Which is a kind of small demo, made as a present to some other member of the demoscene, who is getting married. This wedtro, turned out to be the buggiest piece of shit I’ve ever released, and it’s been bugging me for the past decade. Until today I decided to fix it.

Read the rest of this entry »

Plugin reloading for 3dsmax exporters

I revisited recently a dormant project of mine, for which I unfortunately need to write a 3dsmax exporter plugin.

Now, I’m always pissed off from the start when I have to write code on windows and visual studio, but having to deal with 3dsmax on top of that, really just adds insult to injury. It’s not just that maxsdk is a convoluted mess. Or that it needs a very specific version of visual studio to write plugins for it (which is really Microsoft’s fault, to be fair). No, my biggest issue so far is that 3dsmax takes about 3 years to start up, and there is no way to unload, or reload a plugin without restarting it.

Whenever I fix a tiny thing in the exporter plugin I’m writting, and I want to try it out and see if it does the buissiness, I have to shut down 3dsmax, start it up again (which takes forever), load my test scene, then try to export again and see what happens. This is obviously unacceptable, so I really had to do something about it.

Read the rest of this entry »

Generating multiple sample positions per pixel

Anti-aliasing in ray tracing, requires casting multiple rays per pixel, to sample the whole solid angle subtended by the imaginary surface of each pixel, if we consider it to be a small rectangular part of the view plane (see diagram).
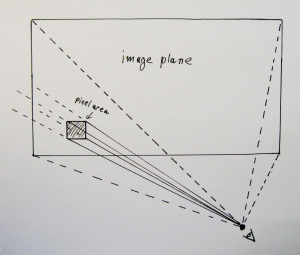
framebuffer pixel area

It’s obvious that to be able to generate multiple primary rays for each pixel, we need to have an algorithm that given the sample number, calculates a sample position within the area of the a pixel. Since it’s trivial to map points in the unit square, onto the actual area of an arbitrary pixel, it makes sense to write this sample position generation function, so that it calculates points in the unit square.

The easiest way to write such a function would be to generate random points in the unit square, like this:

void get_sample_pos(float *pos)
{
    pos[0] = (float)rand() / (float)RAND_MAX - 0.5;
    pos[1] = (float)rand() / (float)RAND_MAX - 0.5;
}

The problem with this approach is that, even if our random number generator really has a perfectly uniform distribution, any finite number of sample positions generated, especially if that number is in the low tens, will probably not cover the area of the pixel in anything resembling a uniform sampling. Clusters are very likely to occur, leaving large areas of the pixel space unexplored by our rays.
As the number of samples gets larger and larger, this problem is somewhat mitigated, but especially if we’re not writting a path tracer, we’re usually dealing with anything between 4 to 20 rays per pixel, no more.

The following animation shows random sample positions generated by the code above. Even at about 40 samples, the left part of the pixel is inadequately sampled.
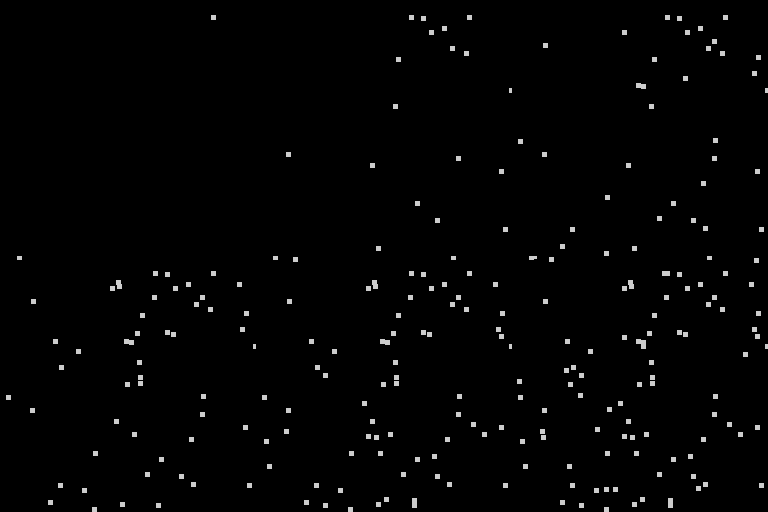
random sample generation

Another approach is to avoid randomness. The following function gets the sample number as input, and calculates its position by recursively subdividing the pixel area, taking care to spread the samples of each recursion level around as much as possible instead of focusing on one quadrant at a time.

void get_sample_pos(int sidx, float *pos)
{
    pos[0] = pos[1] = 0.0f;
    get_sample_pos_rec(sidx, 1.0f, 1.0f, pos);
}

static void get_sample_pos_rec(int sidx, float xsz, float ysz, float *pos)
{
    int quadrant;
    static const float subpt[4][2] = {
        {-0.25, -0.25}, {0.25, -0.25}, {-0.25, 0.25}, {0.25, 0.25}
    };

    /* base case: sample 0 is always in the middle, do nothing */
    if(!sidx) return;

    /* determine which quadrant to recurse into */
    quadrant = ((sidx - 1) % 4);
    pos[0] += subpt[quadrant][0] * xsz;
    pos[1] += subpt[quadrant][1] * ysz;

    get_sample_pos_rec((sidx - 1) / 4, xsz / 2, ysz / 2, pos);
}

And here’s the animation showing that code in action (colors denote the recursion depth):
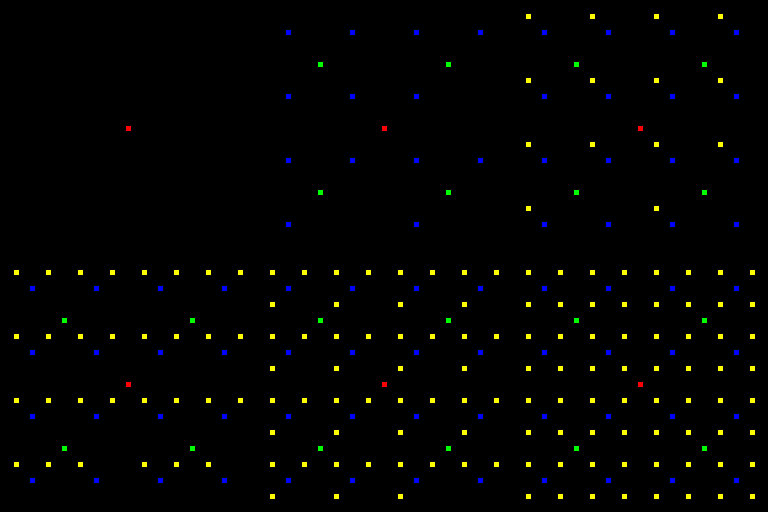
regular subdivision sampling

This sampling is perfectly uniform, but it’s still not ideal. The problem is that whenever we’re sampling in a regular grid, no matter how fine that grid is, we will introduce aliasing. By breaking up each pixel into multiple subpixels like this we effectively increase the cutoff frequency after which aliasing occurs, but we do not eliminate it.

The best solution is to combine both techniques. We need randomness to convert aliasing into noise, which is much less perceptible by human brains trained by evolution to recognize patterns. But we also need uniform sampling to properly explore the whole area of each pixel.

So, we’ll employ a technique known as jittering: first we uniformly subdivide the pixel into subpixels, and then we randomly perturb the sample position of each subpixel inside the area of that subpixel. The following code implements this algorithm:

void get_sample_pos(int sidx, float *pos)
{
    pos[0] = pos[1] = 0.0f;
    get_sample_pos_rec(sidx, 1.0f, 1.0f, pos);
}

static void get_sample_pos_rec(int sidx, float xsz, float ysz, float *pos)
{
    int quadrant;
    static const float subpt[4][2] = {
        {-0.25, -0.25}, {0.25, -0.25}, {-0.25, 0.25}, {0.25, 0.25}
    };

    if(!sidx) {
        /* we're done, just add appropriate jitter */
        pos[0] += (float)rand() / (float)RAND_MAX * xsz - xsz / 2.0;
        pos[1] += (float)rand() / (float)RAND_MAX * ysz - ysz / 2.0;
        return;
    }

    /* determine which quadrant to recurse into */
    quadrant = ((sidx - 1) % 4);
    pos[0] += subpt[quadrant][0] * xsz;
    pos[1] += subpt[quadrant][1] * ysz;

    get_sample_pos_rec((sidx - 1) / 4, xsz / 2, ysz / 2, pos);
}

And here’s the animation showing the jittered sample position generator in action:
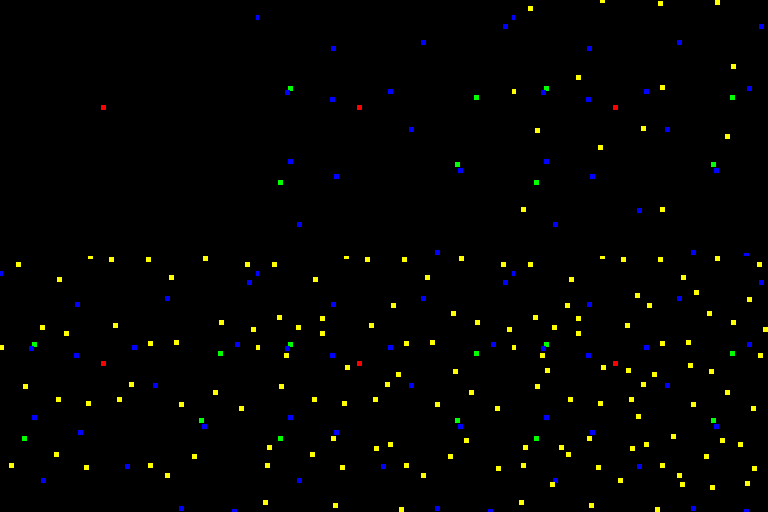
Jittered sample generator

Color space linearity and gamma correction

Ok so it’s a well known fact among graphics practitioners, that pretty much every game does rendering incorrectly. Since performance, and not correctness is always the prime consideration in game graphics, usually we tend to turn a blind eye towards such considerations. However with todays ultra-high performance programmable shading processors, and hardware LUT support for gamma correction, excuses for why we continue doing it the wrong way, become progressively more and more lame. :)

The gist of the problem with traditional real-time rendering, is that we’re trying to do linear operations, in non-linear color spaces.

Let’s take lighting calculations for example, when light hits a plane with 60 degrees incidence angle from the normal vector of the plane, Lambert’s cosine law states that the intensity of the diffusely reflected light off the plane (radiant exitance), is exactly half of the intensity of the incident light (irradiance) from that light source. However the monitor, responsible for taking all those pixel values and sending them rushing into our retinas, does not play along with our assumptions. That half intensity grey light we expect from that surface, becomes much darker due to the exponential response curve of the electron gun.

Simply put, when half the voltage of the full input range is applied to the electron gun, much less than half the possible electrons hit the phosphor in the glass, making it emmit lower than half-intensity light to the user. That’s not a defect of the CRT monitors; all kinds of monitors, tv screens, projectors, or other display devices work the same way.

So how do we correct that? We need to use the inverse of the monitor response curve, to correct our output colors, before they are fed to the monitor, so that we can be sure that our linear color space where we do our calculations, does not get bent out of shape before it reaches our eyes. Since the monitor response curve is approximately a function of the form: x^\gamma where \gamma = 2.2 usually, it mostly suffices to do the following calculation before we write the color value to the framebuffer: x^\frac{1}{\gamma}. Or in a pixel shader:

gl_FragColor.rgb = pow(color.rgb, vec3(1.0 / 2.2));

That’s not entirely correct, because if we are doing any blending, it happens after the pixel shader writes the color value, which means it would operate after this gamma correction, in a non-linear color space. It would be fine if this shader is a final post-processing shader which writes the whole framebuffer without any blending operations, but there is a better and more efficient way. If we just tell OpenGL that we want to output a gamma-corrected framebuffer, or more precisely a framebuffer in the sRGB color space, it can do this calculation using hardware lookup tables, after any blending takes place, which is efficient and correct. This fucntionality is exposed by the ARB_framebuffer_sRGB extension, and should be available on all modern graphics cards. To use it we need to request an sRGB-capable framebuffer during context creation (GLX_FRAMEBUFFER_SRGB_CAPABLE_ARB / WGL_FRAMEBUFFER_SRGB_CAPABLE_ARB), and enable it with glEnable(GL_FRAMEBUFFER_SRGB).

Now if we do just that, we’re probably going to see the following ghastly result:
bleach

The problem is that our textures are already gamma-corrected with a similar process, which makes them now completely washed out when we apply gamma correction in the end a second time. The solution is to make color values looked up from textures linear before using them, by raising them to the power of 2.2. This can either be done in the shader simply by: pow(texture2D(tex, tcoord).rgb, vec3(2.2)), or by using the GL_SRGB_EXT internal texture format instead of GL_RGB (EXT_texture_sRGB extension), to let OpenGL know that our textures aren’t linear and need conversion on lookups.

The result is correct rendering output, with all operations in a linear color space:
gamma-corrected rendering output

A final pitfall we may encounter is if we use intermediate render targets during rendering, with 8 bit per color channel resolution, we will observe noticable banding in the darker areas. That is because our 8bit/channel textures are now raised to a power and the result is again placed in an 8bit/channel render target, which obviously wastes color resolution and loses details, which cannot be replaced later on when we gamma correct the values again. Bottom-line is that we need higher precision intermedate render targets if we are going to work in a trully linear color space. The following screenshots show a dark area of the game when using a regular GL_RGBA intermediate render target (top), and when using a half-float GL_RGBA16F render target (bottom):

linear textures when using an 8bit/channel intermediate render target

linear textures when using an half-float intermediate render target

Color artifacts are clearly visible in the first image, around the dark unlit area.

Kernel Development from Scratch

I’ve started a series of articles for the new Greek magazine: Linux Inside. The articles aim to introduce the reader to kernel development, by starting from scratch and building up a small working kernel.

The first issue of Linux Inside, which should be available by now, includes the first part of the series which covers setting up the development tools for compiling and running the kernel both on the real machine and in a simulator, bootstrapping with multiboot boot loaders, and text output by driving the VGA in text mode.

For obvious reasons the full source code supplementing each article could not fit in the pages of the magazine, only the most relevant snippets are included. So make sure to follow the URL at the start of the article to download the full source code and have it handy while you read. The source code for the first article can be found here.

So go grab a copy of the Linux Inside magazine and let me know what you think. Each article will also contain exercises for the readers, so have a go at them and send me your code! I’ll try to include it in the next issue.

Oh and of course each article will be released under a free license (I’m thinking either GNU FDL or CC BY-SA) when each issue goes out of circulation.

edit: Just made a website for the series.

Third OpenGL article

The third part of my OpenGL graphics programming series for the greek linux format magazine is available for a few days now. So make sure you don’t miss the January-February issue of linux format, if you wish to learn about texture mapping. A technique which, when used properly, can greatly increase the realism of our 3D objects, at virtually no extra processing cost on modern graphics hardware.

This time the accompanying source code for the examples is not included in the magazine’s dvd, so go grab a copy from my website.

Finally, I forgot to mention that the first of these articles is now available for download in PDF format.